Check the Vehicle Manual Before Connecting Cables
To jump-start a car safely, follow the vehicle manufacturer’s procedure first. A jump-start is suitable only when the vehicle manufacturer permits it and the battery is not cracked, swollen, leaking, frozen, or giving off a strong odor. Confirm the marked jump points, voltage, cable order, and whether either vehicle is hybrid or electric. Keep the vehicles apart, follow the manual’s accessory settings, and never let clamps touch.
If the car has collision damage, water exposure, smoke, overheating, or an unknown high-voltage warning, do not attempt a jump-start. Arrange recovery instead.
A car that will not start can have a discharged battery, a poor connection, or another starting fault. This guide explains how to jump-start a car safely when the approved procedure allows it, how to stop an unsuccessful attempt, and what to check afterward. A successful start does not prove that the battery or charging system is healthy.
Jump-Start Safety at a Glance
- Before connecting: confirm permission, voltage, polarity, battery condition, and the approved jump points.
- Ready to proceed? Follow the numbered cable and starting steps, only when they match both manuals.
- It will not start? Stop and disconnect before checking connections. Never adjust live clamps.
- Clicking or stalling? Use the symptom table to understand what needs testing.
- It starts? Arrange proper charging and testing. A successful start does not confirm battery health.
Use this checklist to find the relevant section. Read its full safety instructions before acting.
Decide Whether a Jump-Start Is Appropriate
Read the instructions for the exact model, year, and powertrain of both vehicles. Check the booster or cable instructions too. A battery located in the trunk or under a seat may have designated jump points elsewhere. Do not dismantle trim or select a convenient bolt by guesswork.
| What you find | Your next step |
|---|---|
| Slow cranking after lights were left on, with no damage or warning signs | A jump-start may be suitable if the manuals permit it. Plan to charge and test the battery afterward. |
| Swelling, leakage, a frozen case, unusual heat, hissing, smoke, or a strong sulfur-like odor | Do not connect a booster or charger. Keep away and arrange professional help. If there is fire or immediate danger, call emergency services. |
| Unknown voltage, unclear polarity, inaccessible approved jump points, or conflicting instructions | Stop. Ask for model-specific assistance before connecting anything. |
| Normal-speed cranking but the engine does not fire | A boost may not address the cause. Avoid repeated attempts and arrange diagnosis. |
| An exposed traffic lane, floodwater, or an unsafe working area | Prioritize people and recovery. Do not stand in traffic or push the car into danger to position a donor. |
For hybrids and EVs, low-voltage support is separate from the traction battery. Never connect jumper leads to orange high-voltage cables or components. NHTSA’s electric and hybrid vehicle guidance explains the additional risks around damaged high-voltage systems.
Prepare the Vehicle and Equipment
- Check compatibility. Use equipment approved for the vehicle’s low-voltage battery and engine. This conventional procedure is for compatible 12-volt, negative-ground vehicles only. Do not use a 24-volt source on a 12-volt system.
- Inspect before connecting. Cable insulation and clamps must be intact. Stop if terminals are loose, damaged, or heavily corroded. Cleaning and terminal repairs are separate maintenance tasks, not connected jump-start steps.
- Secure both vehicles. Keep them apart, apply parking brakes, and select Park for an automatic or neutral for a manual as instructed. Switch ignitions off before connection and set accessories as the manuals require.
- Protect yourself. Wear eye protection and suitable protective gloves. Remove metal jewelry. Keep flames, cigarettes, and sparks away from batteries. Never run an engine in an enclosed garage.
- Plan the cable route. Keep leads, clothing, and hands clear of belts, fans, fuel-system parts, and hot surfaces. Electric cooling fans may start unexpectedly.
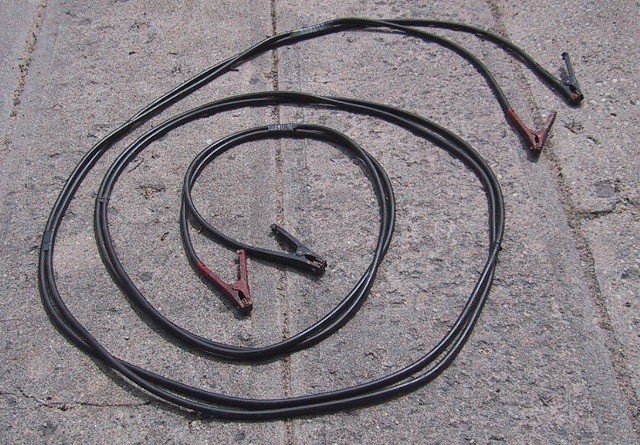
Confirm the battery and booster are compatible
A donor vehicle is an option only if its manufacturer allows it. Do not assume a hybrid, EV, or a vehicle with a similar-looking battery is an approved donor. A portable pack also needs the correct voltage, battery compatibility, capacity, charge level, and operating temperature range.
Use the actual battery label and the correct vehicle manual. A photo or a similar-looking battery cannot identify your vehicle’s required voltage, chemistry, or connection points.
How to Jump-Start a Car With Jumper Cables
Use the following sequence only if it matches both vehicle manuals. Manufacturer-designated terminals, operating instructions, and limits take priority. If the instructions do not agree, stop and use professional assistance.
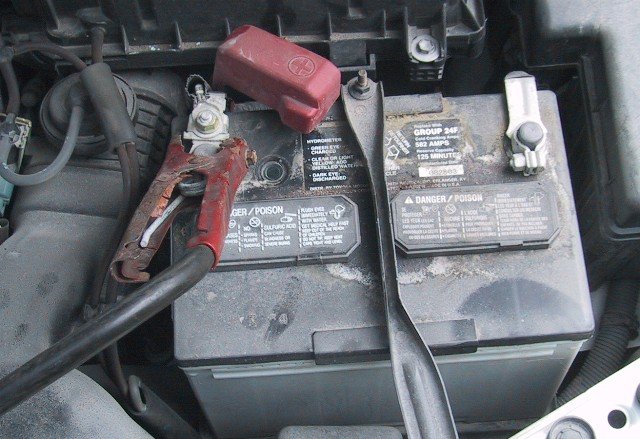
Identify the positive (+) point first
Look for the positive (+) marking before attaching anything. In this real photo, the red clamp is at the positive terminal, while its cable insulation is black. Cable color alone does not establish polarity.
Your vehicle may require a remote jump post rather than direct battery access. Find that point in the exact vehicle manual. Do not copy this battery’s physical layout or use a clamp with damaged insulation.
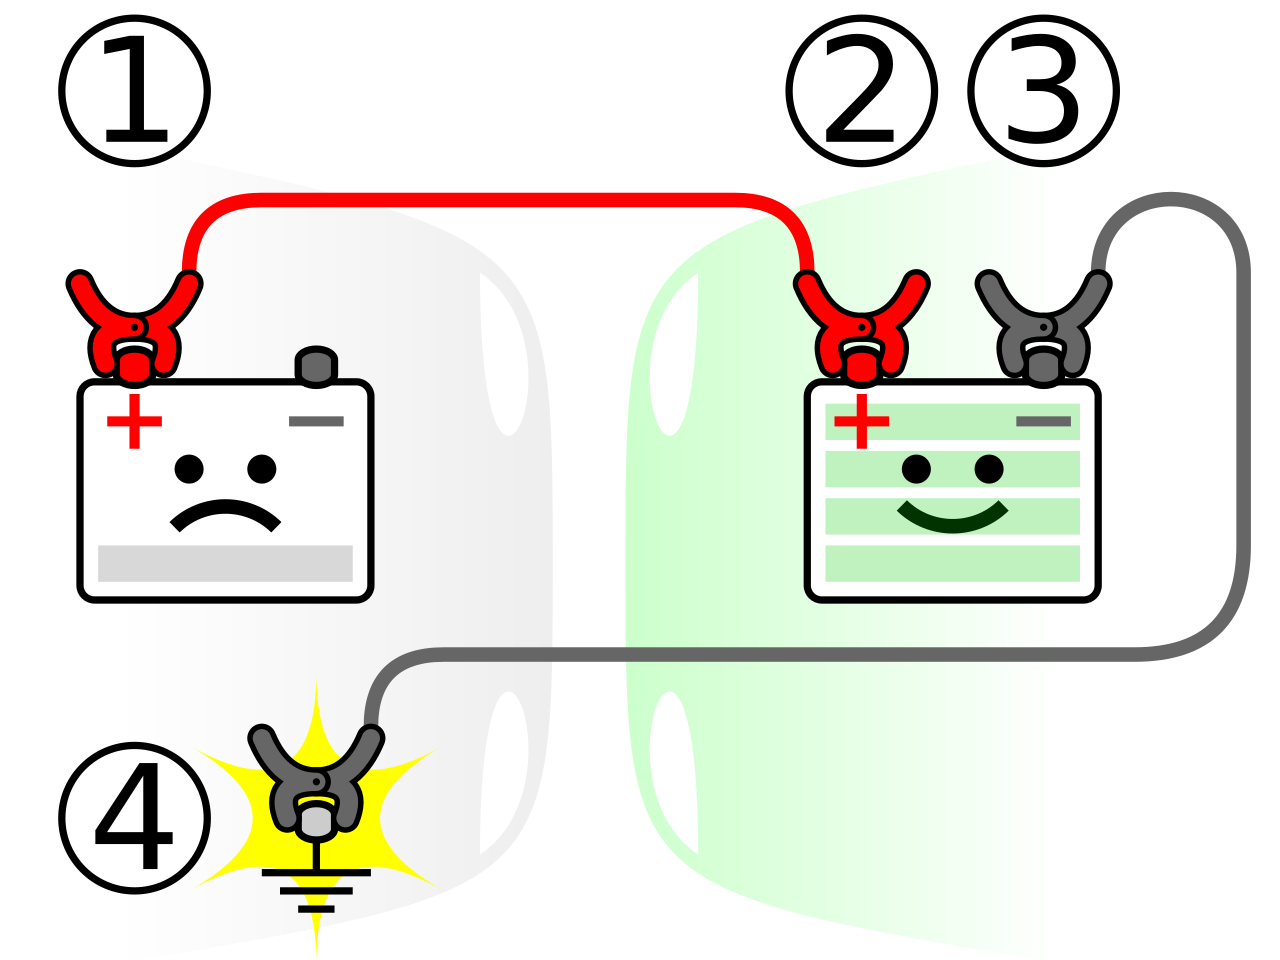
Connect the cables in the approved order
- Connect one red clamp to the disabled vehicle’s designated positive (+) jump point.
- Connect the other red clamp to the donor’s designated positive (+) connection.
- Connect one black clamp to the donor’s designated negative (-) connection.
- Connect the remaining black clamp to the disabled vehicle’s manufacturer-approved ground point, away from the battery where specified.
For a conventional ground-point procedure, do not substitute the discharged battery’s negative terminal, a fuel line, or an arbitrary bracket. Confirm polarity from the markings, not cable color alone. Keep every free clamp away from other clamps and metalwork.
Attempt the start without repeated cranking
Operate the donor and attempt to start the disabled vehicle exactly as the manuals direct. Donor engine speed, waiting intervals, and permitted cranking duration vary. Do not improvise higher revs or repeated attempts. Stop when the prescribed attempt limit is reached, the pack displays a fault, or the equipment becomes abnormally hot.
Do not reposition or wiggle connected clamps. If there is a poor connection, use the stop-and-disconnect procedure below before inspecting it. If smoke, hissing, a strong odor, or significant sparking develops, stop and keep clear rather than reaching over the battery.
Disconnect after a successful start
Follow the manuals for any stabilization period and whether engines remain running during removal. For the conventional sequence above, remove the clamps in reverse order:
- Diagram point 4: black clamp from the recovered vehicle’s approved ground point.
- Diagram point 3: black clamp from the donor’s negative connection.
- Diagram point 2: red clamp from the donor’s positive connection.
- Diagram point 1: red clamp from the recovered vehicle’s positive jump point.
Keep disconnected clamps separated and clear of metal. Remove only the jumper equipment, not the vehicle’s installed battery cables. Restore jump-point covers. Ford’s jump-start instructions illustrate the reverse removal sequence and explain why the vehicle battery remains connected.
Stop and Disconnect Before Checking Connections
A connection check must not become a live-clamp adjustment. If an attempt fails without smoke, heat, leakage, or other danger signs, use this sequence:
- Stop cranking. Switch both ignitions off for an aborted attempt, and switch a portable booster off if one is in use, following the applicable shutdown instructions.
- Disconnect the jumper equipment in the approved order. For the conventional cable setup above, use the four-step reverse order. Do not disconnect the installed vehicle battery.
- Only after all jumper clamps are removed, inspect the equipment and approved contact points. Do not reposition a clamp to improve contact while any jumper lead remains connected.
- If you find damaged leads, a loose battery terminal, or significant corrosion, arrange repair. Do not scrape, tighten, or clean the battery connections as an improvised roadside fix.
- Reconnect only when the instructions, condition, and contact points are clear and another attempt is permitted. Otherwise, arrange diagnosis or recovery.
If the equipment is hot, smoking, hissing, leaking, or connected with reversed polarity, do not grab the clamps. Stop the attempt, switch off from a safe position only if possible, move people away, and seek professional help. An emergency is different from a routine failed-start check.
Using a Portable Jump Starter, Hybrid, or EV
Follow both the vehicle manual and the pack’s instructions. A pack is not automatically suitable because its clamps fit. Connect it while switched off if instructed, use the designated points, and activate it only after the prescribed checks. Observe its attempt limits, cooling intervals, fault indicators, and shutdown order.
Do not bypass a fault indication with a force or override setting. Some devices disable important protections in that mode. NOCO warns that manual override disables spark and reverse-polarity protection. This guide does not recommend that mode as a roadside troubleshooting step.
Hybrid and EV low-voltage systems are model-specific and are not all the same voltage or chemistry. Successful support may wake the electronics or allow a READY state rather than crank an engine. It does not recharge an empty traction battery.
For example, the Tesla Model Y 2020–2024 manual gives different instructions for lead-acid and lithium-ion low-voltage batteries and prohibits using Model Y to jump-start another vehicle. Do not transfer that procedure to a different model or battery version.
What Clicking and Other Starting Symptoms Mean
A clicking sound does not prove the starter motor works. It may be a relay or solenoid operating while insufficient power, resistance, or a starter fault prevents cranking. The pattern helps guide testing but cannot identify the failed part by itself.
| Symptom | Possible causes | Useful next check |
|---|---|---|
| Rapid clicking or lights dimming during a start attempt | Low battery charge, a weak battery, or resistance in cables and connections | Charge and test the battery; inspect the starting circuit |
| One click with no engine rotation | Power-supply, solenoid, starter, or mechanical issues | Battery condition, voltage drop, starter command, and mechanical checks |
| No click and no cranking | Low power, a connection fault, start authorization, or control-circuit issues | Record dashboard messages and arrange electrical diagnosis |
| Normal cranking without starting | Fuel, ignition, engine-management, or other faults | Stop repeated boosts and investigate the no-start condition |
| Starts, then stalls or shows a charging warning | Charging, connection, battery, or engine-running faults | Do not set off to recharge it by driving. Arrange assistance |
DENSO’s starter troubleshooting guidance supports checking supply voltage, connections, and the control circuit before condemning the starter. Do not bridge starter terminals or bypass safety interlocks.
What to Do After the Car Starts
There is no universal driving time that guarantees a full recharge. A jump-start supplies starting assistance. Charge recovery depends on battery condition, discharge depth, charging strategy, electrical demand, and time. Driving for 30 minutes is not proof that the battery is ready for the next start.
Arrange controlled charging with a charger suited to the battery chemistry and the vehicle’s approved charging points, followed by battery and charging-system testing. Follow the charger and vehicle instructions; do not charge a damaged or frozen battery. CTEK explains why alternator charging may be insufficient after deep discharge.
Check before driving away
If the engine stalls, a charging warning stays on, cables have overheated, or steering and other systems behave abnormally, do not drive to recharge the battery. Arrange help. Otherwise, follow the manual’s post-start checks and plan a battery assessment. A restart is not guaranteed.
A technician may need to check battery state of charge and starting capacity, cable voltage drop, and charging output under the vehicle’s specified conditions. Repeated overnight discharge may require a parasitic-draw investigation after modules enter sleep mode. Read our battery testing guide to understand what the results can and cannot show.
Avoid Another Flat Battery Without Buying Parts Blindly
One discharge after leaving a light on does not automatically justify replacement. If the battery is safe to charge, charge and test it, then check why it discharged. Age, one voltage reading, or a successful boost alone is not a replacement diagnosis.
In Dubai, tell the workshop about long parking periods, frequent short trips, dashcams, recently fitted accessories, and any earlier jump-starts. These details help distinguish a usage issue from a battery, connection, or charging fault. For a seldom-used vehicle, ask whether an approved maintainer is suitable.
Keep maintenance separate from recovery. Do not open sealed batteries, add water to AGM batteries, or wash battery terminals during a jump-start. Battery removal and terminal servicing can require vehicle-specific shutdown and reset procedures.
If testing supports replacement, match the specified battery technology, fitment, capacity, and registration requirements. Our UAE battery types and buying guide covers those choices. There is no need to buy a different battery just because a booster could not start the vehicle.
Sources for the Safety Checks
The linked Ford manual shows an example of a conventional procedure. Tesla shows why low-voltage procedures and donor restrictions vary. DENSO covers starting diagnosis, CTEK covers controlled charging, NOCO covers booster limitations, and NHTSA covers high-voltage safety. Use your own vehicle and equipment manuals for the actual procedure.
The Key Takeaway Before Your Next Attempt
Knowing how to jump-start a car safely includes knowing when to stop. Confirm the approved equipment and connection points, never adjust connected clamps, and investigate an unsuccessful start. Afterward, use charging and testing to decide what the vehicle needs.
Arrange Battery and Charging-System Testing
If the vehicle will not start, starts and dies, or needs another jump soon afterward, contact our workshop in Al Quoz 4, Dubai. Share the model, year, powertrain, starting symptom, warning messages, and what has already been tried. If it cannot be driven safely, discuss recovery before setting off.
Jump-Start Questions
Can I jump-start a car in the rain?
Only consider it when the vehicle and equipment instructions permit the conditions and the working area is safe. Do not proceed in standing water, after flooding, during lightning, or with wet or damaged equipment. Arrange assistance if safe access and dry connections cannot be maintained.
Does a jump starter charge an empty EV traction battery?
No. Approved low-voltage support may wake the vehicle’s electronics. An empty high-voltage traction battery needs the vehicle’s normal charging process or recovery to a suitable charger.
Can I push-start the car instead?
Do not treat push-starting as a universal backup. Many vehicles prohibit it, including automatic vehicles covered by the Ford guidance above. Follow the exact owner manual or arrange recovery.
Can I disconnect a battery cable to test the alternator?
No. Removing an installed battery cable while the engine runs is not a suitable charging-system test and can damage electronics. Use the manufacturer-approved diagnostic procedure.
Why can the lights work when the engine will not crank?
Working lights do not prove the battery and connections can supply the current needed to crank an engine. Battery testing and circuit checks are needed before choosing a replacement part.
What should I do if the booster shows an error?
Stop and follow the device’s shutdown instructions. Read the error guidance before any retry. Do not move connected clamps or force an override to bypass a polarity, temperature, or battery-detection warning.